Tools Markings on Wire
by Karen Sewell
(Ohio)
I am having a difficult time with tool marks, especially when working with heavier gauge wires like 14g or 16g. How do you avoid tool marks?
Thanks!
Stacy's Answer:
Hi Karen!Tool marks are one of those things that tend to mostly disappear on their own as you become a more seasoned wire worker. At first, folks seem to have a white-knuckled death grip on their pliers. You learn that the white knuckle grip is not necessary, and as you work with wire you will develop a 'feel' for the wire and just how much force is needed to exert to get the job done without making a mess of the wire.
Here are a few tips to help prevent the tool marks.
1. Relax! Loosen your grip. You apply about the same holding force as you would your knife and fork.
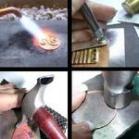
2. Are you using the right tools for the job? Not all tools are created equally. When working with heavier gauges of wire, you need to use tools that are meant to handle them. Heavier duty pliers, comfortable grips and, generally, using the correct tool for the job make all the difference.
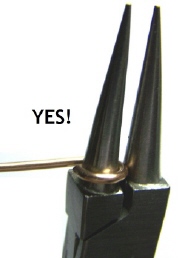
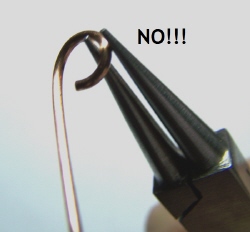
I watch many students try to manipulate the wire using the tiny ends of their round-nose pliers. Usually, round-nose pliers are not the tool they need, but rather flat or chain-nose pliers are necessary to do the job. Round-nose pliers are great for making coils and eyepins...round shapes. However, because of their round shape, the area of the plier jaws that comes into contact with your eyepin or coil is very small, which could easily gouge the soft metal if you're not careful. When closing an eyepin completely, hold the wire in its original position down on the jaws of the pliers and turn the pliers to close the loop.
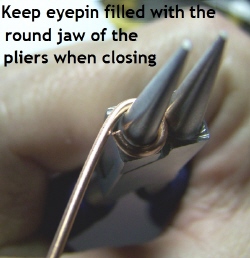
Do not attempt to grab the wire with the tips of the pliers and try to force the wire closed. This can damage your pliers as well as ding up the wire.
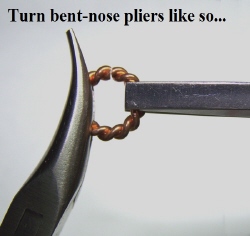
When opening and closing jumprings, use a pair of flat-nose pliers. If you only have one of these tools, but also have a set of bent-nose pliers, reverse the bent-nose pliers so that the outside curve is facing the jumpring. This gives you more plier on the jumpring. You can then easily open and close the rings using a push-pull movement. You are much more likely to have a perfectly smooth jumpring when you do this.
Also make sure that the wire you're working on is dead soft wire and not half or full hard wire. Dead soft is more malleable and easier to work with. It will harden on its own as you work with it by coiling, twisting, hammering, etc. This is called work-hardening.
3. When you do get tool marks where you don't want them, try filing or sanding them to make them less obvious. Also, tumbling will help to reduce the mark and adding a patina to an item helps make marks less noticeable.
We've all had our fair share of marking up the wire when we were new. Quality tools, using the proper tools and a touch of experience all help to make the problem disappear. One day, you'll be creating something and it will hit you...there are no plier marks! Practice DOES makes perfect!
Comments for Tools Markings on Wire
|
||
|
||