Making Large "S" Link Components
by Lori Smith
(Greenwood, IN)
Hi Stacy,
Do you have any tips on making the large "S" links like the ones you used in your "LeCarnivale" and keeping the curves consistent? Is there an easier way than just eyeballing it or drawing a pattern?
Thanks!
Stacy's Answer:
This is a great question Lori!Whenever I make a new component, I always start out by measuring a length of wire in the gauge I plan to use. I recommend copper or inexpensive craft wire. After finishing my link or component I measure the leftover...this tells me how much wire I used to make the new component/link. I hot glue it to a page and write down the "recipe". This way I don't have to always reinvent the wheel when I want to use the same size component again.
Now....on to the "S" links!
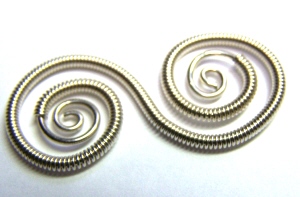
I don't use a pattern drawn on a paper, but you could certainly do that. I usually just eyeball them. For the "S" links, first envision what size hole (eyepin) you want in the center of the link's spiral...a small eyepin or a larger one?
Start the spiral by making an eyepin at one end of your wire. If you're going to add a wire coil to your link, slide it on now. Then make an eyepin on the other end of the wire.
Your two eyepins should be on opposite sides of the straight wire...one on the top and one on the bottom. If you think of the wire as a straight line, one eyepin loop will be above the line and one loop will be below the line. This creates an "S" shape. If your eyepin loops are on the same side of the line, you'll end up with a "C."
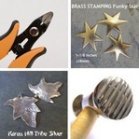
Grasp the eyepin with your chain nose pliers as shown in the photo below. You can then pull the wire around using your free hand. Move the pliers to grasp the wire in the same manner as you make your curve. Repeat on the other side until you have the "S" look that you want. You can make them as tight or loose as you wish, one side larger or smaller, etc. When holding the "S" links in the manner, you'll find it very easy to bend or curve that wire in whatever manner you want without getting any of those annoying little kinky bits!
When making spirals or wiredoodles where you need a nice rounded edge, remember to grasp the wire perpendicularly as shown in the photo. Hold it firmly in the pliers while you use your other hand to manipulate the wire.

Start with an eye pin and grasp your wire as shown in the photo above. Slip your coiled wire section onto it that you’ve made ahead of time :) Start a coil at the other end, remembering to coil in the opposite direction to create an “S”.

You can pinch the spiral of the "S" between your thumb and forefinger and make little adjustments to get the proper look.
If you use the same length of wire and mark your round-nose pliers with a Sharpie® so that all your eyepins are the same size, it should be easy for you to get consistent results. Complete one step to all links before going to the next step:
1. Cut all the wires.
2. Make all the eyepins.
3. Coil one side.
4. Coil the other side.
Again, do each step to all links, instead of creating each link in its entirety. It's easier to repeat a pattern if you do it multiple times for each piece before moving on to the next step.
Always keep in mind that these are handmade items and you shouldn't expect them to look like a machine massed-produced them! Slight variations add to the charm of artisan jewelry along with the expression of your unique personal style.
Comments for Making Large "S" Link Components
|
||
|
||
|
||
|
Click here to add your own comments Join in and write your own page! It's easy to do. How? Simply click here to return to Jewelry Q & A. |