Copper Etching
by Susie Wiegmann
(Indiana)
Hi Stacy, I have a question about copper etching. I can't seem to get a good etch in copper I use rubber stamps with the Stayz On ink, Radio Shack Etchant Solution. Prior to stamping, I sand and clean the metal and after stamping let the ink dry. I leave the metal face down in the solution for up to an hour. The etching solution does not work much past an hour, I heard.
Your copper etching is so nice and deep. I can't seem to get a deep etch. I clean my copper with steel wool and then I rubber stamp on it with the Stayz On ink, leaving in the Radio Shack etchant for about an hour. I heard that the etchant does not work anymore past an hour. My etching does not seem good enough for me. Do I need to leave in for longer or use another etchant???
If you could offer me some advice I would appreciate it. Your etching always looks so nice.
Thanks for your help.
Susie
Indiana
Stacy's Answer:
Hi Susie!Etching can seem rather mysterious at times. I didn't know that Radio Shack still carried the etchant as I haven't been able to find it there for at least a couple years now. It is possible that your solution is just old or too full of copper particles to be effective any longer. An excellent place to purchase Ferric Chloride is Dick Blick Art Supply. He sells it for cheap and the shipping is very reasonable too.
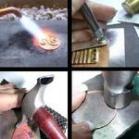
Before etching, prepare your metal by giving it a light buff with very fine 0000 steel wool or with a very fine scrubby pad or sand paper and then rinse with warm, sudsy water. This removes any surface impurities such as oil or little nicks that interfere with the etching process. It sounds like you are doing that. I also wear disposable gloves from this point forward. It protects my hands from the red Stayz-on or the black marker and prevents any oils from my hands getting on the metal. I don't know about the hour timing with the etchant as it will continue to eat straight through the metal until there's no more to eat through! Sometimes a pattern shows up in the metal creating a slight texture, other times the etched areas are totally smooth. I don't know why this happens and assume it must have to do with the structure of the metal itself.
Usually 30-45 minutes is long enough to get a good etch. Before removing the items from the etchant, check them for "doneness". Just don your gloves and lift the 'boat' from the solution. Tilt it so you can so the light catches your discs just right which will show you how deep the etch is. If you want them deeper, then just gently put back into the solution. The Red Stayz-On and the Sharpie markers act as the resist and do not affect the etchant. I've tried other colors of Stayz-on and red works best. Ferric chloride also etches straight back and does not spread like a stain would, so your pattern just gets deeper the longer you leave it in. Yes, you can over-do it, so be sure to check the progress of the etching. Make sure that your items are suspended so that all the copper sludge can fall away from your pattern. If the metal sits in your pattern it will contaminate it resulting in a sloppy etch.
Another method you may wish to try is one you mix yourself. You mix equal parts of hydrogen peroxide (bubbly stuff used on cuts) and muriatic acid (the stuff used to keep your pool clean). Muriatic acid, also known as hydrochloric acid, can be very dangerous if not handled properly. Please read about the safely features when handling dangerous chemicals before attempting to use them. The solution turns a lovely shade of green as copper is absorbed into it. You can use it over and over until it no longer works, just like the ferric chloride. There is a method of etching using a battery and saltwater, but I have not tried it myself.
All of the above methods are for etching copper, brass and bronze and will not work on silver. Try your methods using a fresh solution and make sure that nothing is interfering with the etched particles falling away from your items being etched. I stick mine to the bottom of a solid rubber square using painters or masking tape. The rubber does not absorb the etchant and after cleaning can be used many times again. I use the dense foam toy blocks found at Michael's.
Let me know how it goes!
Stacy :)
Comments for Copper Etching
|
||
|
||
|
||
|
||
|
||
|
||
|
||
|
||
|
Click here to add your own comments Join in and write your own page! It's easy to do. How? Simply click here to return to Jewelry Q & A. |